Tuesday, June 19, 2012

{Welcome Banner}

I have finally come a year and a half from when I created this awesome project and found a time to blog about it...I figure I should start to create a planner for my blog posts, a planner for my projects, and a binder with inserts for storing the projects for each week and one binder for each month...lol!

Ok so maybe it is a little OCD but I think this would be a great way to boost productivity and creativity and also serve as a great way to organize the projects you have completed...this would make it easy to find as well as give you a great source of projects and instructions to use for workshops or clubs...

Enough brainstorming...

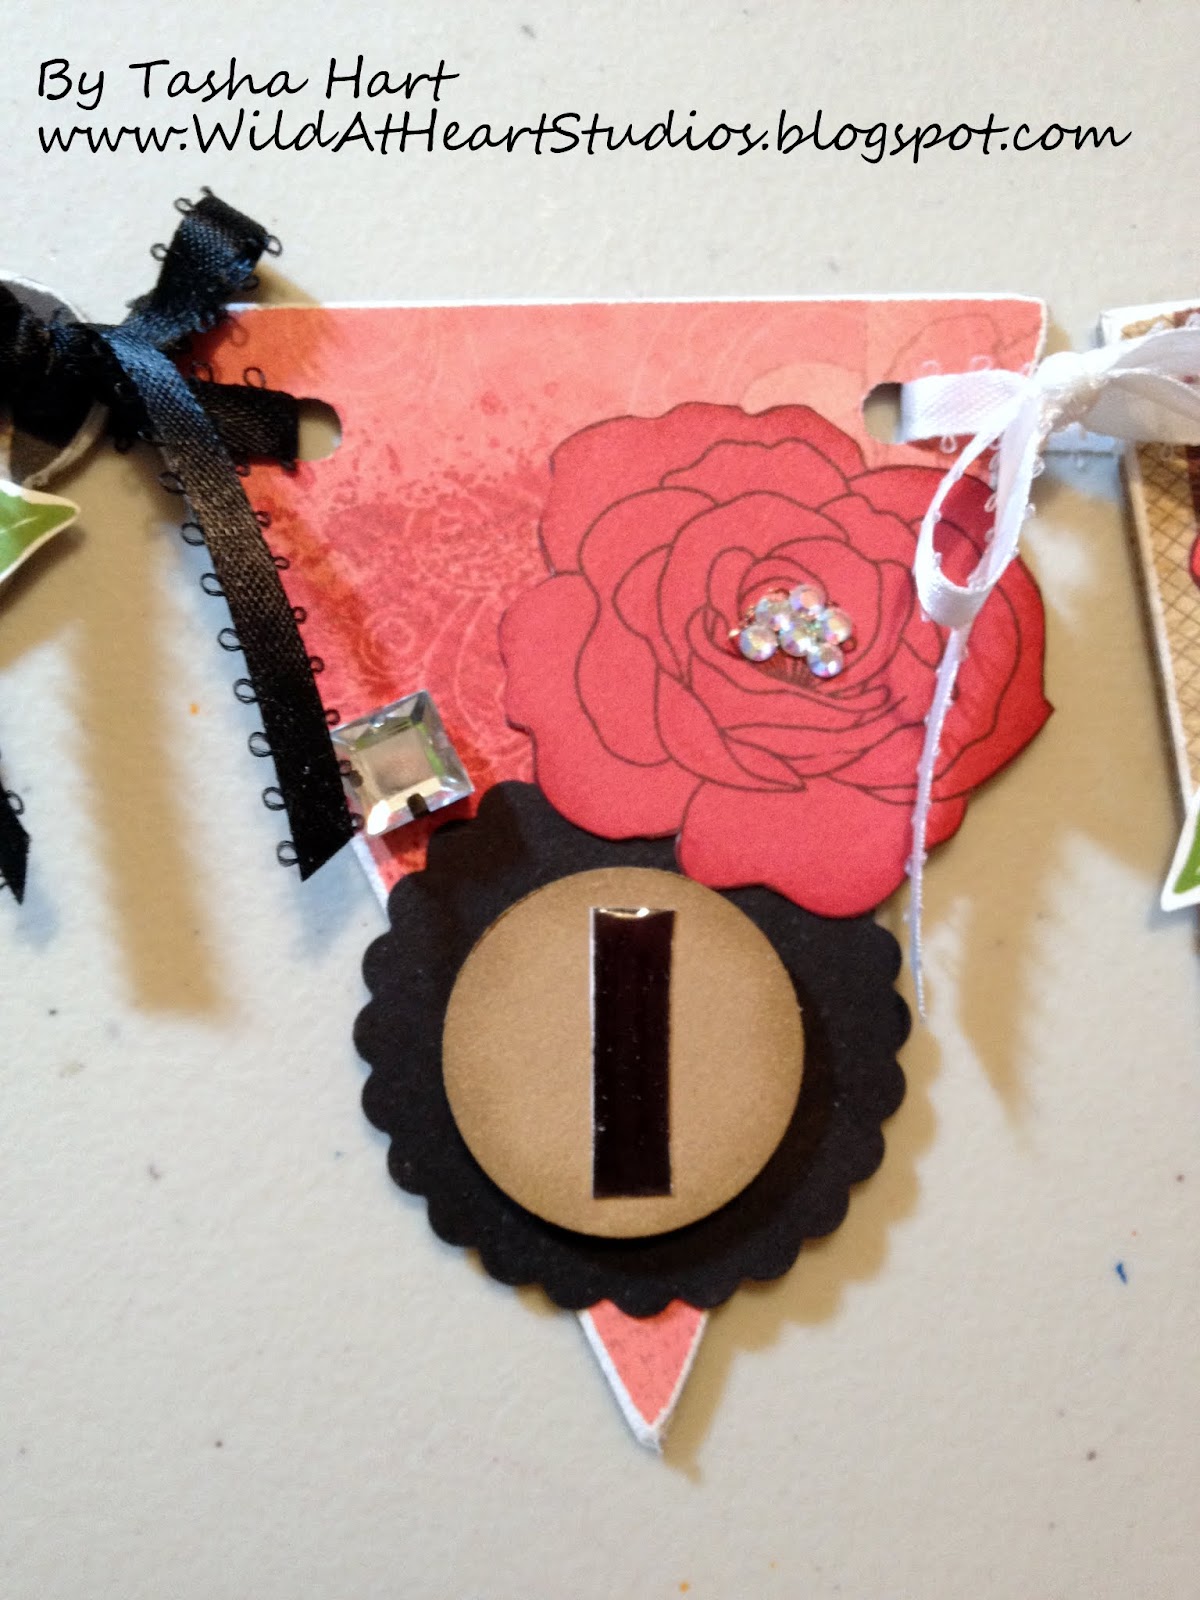
I created this banner as a project to challenge myself after completing the Spooky Banner that was an extra project with the Mischief Workshop On The Go. I decided to use the retired Cherry-O paper packet as I loved it when I saw it shortly after I started my business with Close To My Heart. I bought the paper and embellishments while it was on the While Supplies Last area of my website.

I went to work on picking my papers and cutting them out... I decided to add yo-yo flowers or rosettes...not sure which you all call it but I popped the letters to Welcome onto the centers of the rosettes. I layered the letters which I cut out with the Art Philosophy Cricut Cartridge. (Yes I do use it...lol!)


I added some Cherry-O self adhesive patterned pearl embellishments as well as some stickease. I also added some great buttons with some Colonial White Waxy Flax stitching...I love waxy flax too!

I prefer not to use the jump ring for the banners as I find I tend to have them bend and separate while the banners are hung up. I would definitely not want to sell anything that was less than perfect for a customer so I chose to use ribbon to tie the banner together...not only does it look beautiful but it also works very well and is functional...

Come join the fun over at Heart 2 Heart Challenges...I am and here is another post for this week. The challenge: Ribbon! So start blogging!
Let's Live Inspired!

Monday, June 18, 2012

{Meet & Tweet}

Welcome to my wonderful new adventure... A meet and tweet...
I have never tried this before but had the pleasure to join up two weeks ago, and I had the pleasure of meeting some great people and view some awesome blogs...one of my favorite things!

So here we are today, and I am now a co-host...
I'm #excited !!!

Ready to make new Twitter friends?
Wanna hang out a bit and play? Sweetness, just follow the rules.


RULES:
Link up your Twitter account, not your blog.
Follow your host and co-hosts.
Thanks so much to my amazing co-hosts:
Alissa from Rags to Stitches
Tasha from Wild at Heart
Rebekah from Tailor Made Crafts
Tiffany from Blabbering Thoughts

Loving this hop? Shout it out to all your friends!
The more the merrier.

~~~~~~~~~~~~~~~~~~~~~~~~~~~~~~~~~~~~~~~~~~~~~~~~~~~~~~~

Thanks so much for linking up today!
Hope you've had fun and made some amazing new friends.

Save the Date! Next Hop: 6/28
The more the merrier! Grab a button and add it to your blog.
Our Reflection
<div align="center"><a href="http://our-reflection.blogspot.com/" title="Our Reflection "><img src="http://i1099.photobucket.com/albums/g383/_laurahernandez/MeetTweet-2.jpg" alt="Our Reflection " style="border:none;" /></a></div>
Want to be a future co-host?
Email me at momsgonnasnap@gmail.com.


Like us on Facebook  |  Subscribe to Updates  |  Follow on Bloglovin  |  Follow on Pinterest


Let's Live Inspired!

{Presley Banner}

I have blogged about a couple mini banners I have created but never one of the full size banners or the recent custom banner I completed... So here comes another series of posts featuring banners and ribbon...I love ribbon and will be using these posts as entries to the Heart 2 Heart Challenges this week ~ Ribbon!!! Perfect for several of my projects...

Here it goes...

I recently had a great opportunity to create a mini banner for a little girl...My first instinct was "Dotty Paper!!!" but after a few moments and some questions asked I decided to go "Wild Rock Princess" So Roxie it was!

I used three types of pendents and three patterns of paper from the paper packet. This just happens to be one of my favorite paper packs! I knew my customer liked the Trinity Alphabet stamp set so I knew I would be using them for the name...Presley...sounds so Rocker too!


I started by picking my patterns of paper and began tracing and cutting (once again forgetting to use my Cricut and the Art Philosophy Cartridge...) Once all the pieces were cut, I chose to stamp roses from the Card Word Puzzle stamp set in two different card stock shades ~ Tulip and Smoothie. I decided to alternate them one each pendent. My first Idea was to place the name on each rose...not very impacting!!!


I stamped each letter in black and chose to place them on a Desert Sand circle punched out with the 1 1/4" circle punch. I popped it up and layered it onto a Black scalloped circle that I punched with the 2" Scallop Circle punch. I then liquid glassed each letter - amazing effect!


Now each rose needed bling so I chose to use some Crystazzi jewels in two styles and sizes. Some irridescent and some clear... all bling is perfect to me and the more the better.


I LOVE bling so I knew I had to use some of my Teresa Colling Blingage jewels. Beautiful black jewels that hang so perfectly from a few of the pendents...Talk about Princess Glam...

As I started to assemble the pieces I decided to add a glossy black chipboard key to the banner. I wanted it to be a symbol from this mom to her daughter ~ a key to her heart ~ what every mom gives to their child.


Like I said I LOVE bling! So I decided to up the glam factor and added some Jolee self-adhesive Bling. I opted for these over the Bling Buttons because I wanted the square and rectangle shapes and less round or curved shapes to this project.


Tied with black and white satin bows - this banner is sure to make any Wild Rock Princess smile... I know mine was smiling and asking for her own - with more bling of course!

Hope you enjoyed this project and will come check out all the other great projects featured on Heart 2 Heart Challenges. Maybe this is the week you come and play too!

Let's Live Inspired!

Sunday, June 17, 2012

{Heart 2 Heart Challenges ~ Father's Day Card 2}

This card will be entered for the Heart 2 Heart Challenges this week.

I will start with the supplies I used:
You Are... (S1204)
Trinity Alphabet (E1021)
Dimensional Element - Start (Z1680)
Colonial White Cardstock (1388)
Outdoor Denim Cardstock (1275)
Cocoa Exclusive Ink (Z2114)
Outdoor Denim Exclusive Ink (Z2140)
Sparkles (Z1104)
Bitty Sparkles (Z1263)
Copic Markers

This card was inspired by a photo in the current Idea Book. I love that this is a great perk of the Idea Books, there are so many wonderful examples of inspiration for consultants and customers. I saw this amazing cover to a mini album on page 141. It used the April SOTM. I thought this would make an amazing Father's Day card and it did.


I changed certain aspects like the star and patterns. I placed the card front onto an Outdoor Denim card base that makes a 6" x 6" card. I truly love how this card turned out and hope you did too!

Let's Live Inspired!