Friday, January 20, 2012

{Valentine's Blog Hop ~ Rose Cards}

I was busy making supper last night and in the midst of cooking I had a moment of creative genius! I have to admit I have not made a card in about 3 months...shame on me...(I used last years Christmas card surplus...lol!)

After a quick clean up and kids in the bath and off to bed ?I came down to my craft room and set off to work.
I wanted to make some great Kraft cards and wanted them to be super simple. I find that I do best with cards if I either go all out or I keep it simple!

I kept it to a two tone card with the Kraft base. I used tulip ink for the flowers and I used desert sand for the border stamped on the inside with a simple black statement.
 Front
 Inside
 Back

Now I don't want to give away too much but can you guess what stamps were used to create this card?

Being the last day of the Valentines "Love Me Do" Blog Hop please leave your guess in the comments with your email address and on Monday Jan. 24, 2012 I will announce the winner (randomly drawn) who will win a set of 6 of these great cards. Good luck to you all and hop over to Jenn's Blog and see her project today and be sure to enter the Love Me Do Blog Hop Giveaway draw on her blog for some great prizes!


Let's Live Inspired!

{Valentine's Blog Hop - Roxie Wreath}

Welcome Back for Day 4 of the "Love Me Do" Valentine's Blog Hop!

I have been feverishly trying to play catch up and hope that this will be the one and only time I have to rush to complete items and post my blog posts....With girls on the mend I have been able to spend a little quality time with my crafting!

I wanted to share a wreath with one of my all time favorite paper packs from Close To My Heart. I love the Roxie paper pack....It could be the zebra print paper or even the leopard reverse side, might be the grass looking paper and the intricate design to compliment that pattern on it's reverse. I would definitely say that I love the color combination for it and the Bling buttons!!!

Anyways instead of doing a full out tutorial I will spare that for another time if I have a request for it and press on to the project.

I made the paper wreath in the shape of a heart and find that although not the most conventional shape it seems to work for the item.

I wanted it to hang on an angle and look a little off kilter...oh, my vocabulary is atrocious today...lol!

I used a beautiful piece of sheer black ribbon and tied it at the top to aid in hanging this wreath and added the letters LOVE to double medallions or yo-yo flowers....I had to add a little glitter and some sparkle so, throughout the wreath there are some clear jewels for a little more sparkle...


Hope you enjoy the project and now it's time to head over to Jenn's Blog! Come back tomorrow for my final project in the "Love Me Do" Valentine's Blog Hop!
Let's Live Inspired!

Thursday, January 19, 2012

{Valentine's Blog Hop ~ 10 Things I Love Booklet}

After a long couple days....Two sick little girls and trip to the doctors...I'm back!

I have felt so awful about letting the readers miss out on a couple days of projects so today I will try to catch up and feature a few projects I had hoped to share with you all this week.

I had been working on the Rock the Block kit that CTMH is featuring this month as their current Constant campaign and I used this great ticket stub cut out shape on the Art Philosophy cartridge and thought this would make a great tag booklet one could use to share those special reasons that you love your recipient...

Now I wanted to make it quite large to allow for it to be used as a card or coupon booklet or simply as a gift for that special someone.

I cut out the covers at 3" and the inside pieces I cut out at 2 1/2"


I then cut out several hearts in various colors to match the colors used throughout the booklet.

With a few of the great stamp sets CTMH has I started to stamp...I used 10 Things (C1474), Priceless Love Word Puzzle (D1348) and January's Stamp Of The Month Little Reminder (S1201)  I Stamped the cover and each page heat embossing each number with Black embossing powder to add some emphasis.


I also decided to add some pearl mist to some of the elements of the booklet and so I took water and Pearl Paint and mixed them together to create this great and versatile mist. I use this often so I bought a little spray bottle similar to the one that CTMH Spritzer comes in and mix a bottle of this pearl mist up and set it up on my shelf for the next project I might need it for...To distress the outer edges I took my stippling brush and my Desert Sand ink and stippled all the edges of each page...it adds  a little of a vintage feel...

Here is the finished product!


I hope that you enjoy this great and easy project and look forward to the comments!

Thank you for visiting today for Day 3 of  the "Love Me Do" Valentine's Blog Hop, now hop on over to Jenn's Blog for the next project in the Blog Hop! See you tomorrow!


Let's Live Inspired!

{Valentine's Blog Hop ~ Love Tree}

Welcome to the 2nd day of the "Love Me Do" Valentine's Blog Hop!

After a little glance at all the great projects of Day 1, I felt a little like Christmas...It was like waiting to open the next present each time I was supposed to hop...Well, it got me thinking, I had done a Christmas Ribbon Tree a while back. I love Christmas trees of all kinds, but, who said you couldn't have a cone shaped tree for other occasions through out the year?!?

I think that it is possible to have a stunning tree of ribbons and be able to appreciate the love and care it went into the creation of that item. I wanted to see if it could be possible to make a Ribbon Tree scream Valentine's Day, and Love...

Here's my starting point, I took a papermache cone and painted it with a mixture of a cream white craft paint and CTMH pearl paint. I wanted it to have some shimmer if you ever were to see a little white under the ribbon loops...


Once the ribbons where all cut they were then glued into loops using hot glue. I used two different colors of pink, a light one and vibrant hot pink to add some pop!


When all my ribbon was ready I started to glue each looped ribbon onto the cone carefully selecting a design that I would love and that would look amazing.


I decided that just adding ribbon was not enough to make this tree one that said Love and Valentine's day, it needed more! So I dug into my crafty bling stash and started to add jewels and little paper hearts that were stamped in pink.


I carefully added a few stacked buttons and added it to the top of the tree and tied two beautiful ribbons around the top and tied them into bows. I then took a couple heart jewels and adhered then to the bottom of each ribbon end!

I hope that you love how this turned out as much as I do! It is so easy to take something that you associate with a particular holiday and alter it to fit into another if you are creative and have enough faith in yourself to try. Without trying you are giving up on something fabulous! So try other things and be daring!

Thank you for joining me today for Day 2 of the "Love Me Do" Valentine's Blog Hop! Next person in the hop is Jenn. Check back again with me tomorrow as well for another new idea!
Let's Live Inspired!

Tuesday, January 17, 2012

{Love Me Do Blog Hop}

I will be posting two blog posts tomorrow for this great blog hop as I currently have the unfortunate luck to have a sick little girl in the house. I will be posting my projects still but will be requiring some additional time but do not want to let the readers and visitors down.

In the mean time thank you for visiting and hop on over to Jenn's blog.

Thank you for your understanding and see you tomorrow!

Let's Live Inspired!

Monday, January 16, 2012

{Valentines Blog Hop ~ Love Necklace}

Welcome to the "Love Me Do" Valentine's Blog Hop!

This week, January 16th - 20th, we have a group of 5 talented designers sharing projects with you on their blogs to get you prepared for the upcoming season of LOVE!
Whether you use these designs to create something for your loved ones or spring-board off the inspiration given, we would love to see your work as well, so leave a comment on the blogs as you go through.

On January 24th, we will be giving away a collection of goodies from the group to one lucky participant. The giveaway will be hosted through filling out a Google Docs. form, on Live.Teach.Create on January 20th, asking various questions about the posts throughout the week. All those  who enter with the correct answers will have a chance to win!

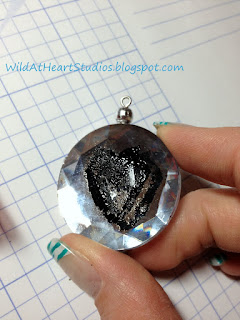
I went shopping last week and found a great deal on Teresa Collins Blingage  accessories, so I scooped them up. Once home I wondered what to do with one of the accessories. It is a big jewel called Kayla's Gems...


I also found a great deal for these satin ribbon necklaces too so thought here was my first valentine's item...I wanted to see if I could challenge myself to create something other than paper crafting. I also wanted to try different techniques too...


I added a couple jewelry hoops to the ribbon and found that it definitely did not scream ...Love or Valentine's....well, it never screamed anything....good thing cause it might have startled me....

I took a look around my craft room and wondered what I could do to add something to this piece and thought...maybe a stamp?!?

I found a petite perks stamp set from CTMH and it was perfect! It had a heart and the word LOVE and they were just the right size...Now what?!? How was I going to stamp this onto my jewel and make it stay...Stazon might work but I don't have any....Archival Ink? Not really sure so kept thinking...What about embossing it?!?

I got my Versamark ink pad out and my Black Embossing Powder out and went to try the unknown...I have never embossed on anything other then paper so this was going to be an adventure in crafting....

I stamped it and everything stuck....I stamped it again and only a little bit stuck....I stamped it a third time and carefully removed any excess powder from areas I did not want it to be and here is what I got....


Now I want to make you aware that the jewel was double sided and it was mirrored so that made this more of a challenge to photograph. I think that it worked out quite well and I might have a little bit of an itch to try other jewelry items in the future...My wheels are turning...

Thank you for joining me today for Day 1 of the "Love Me Do" Valentine's Blog Hop!

Next person in the hop is Jenn, check back again with me tomorrow as well for another new idea.
 
 
Let's Live Inspired!