I wanted to make two banners that were very different from one another so I set out to find two words that would fit within the 10 pieces... Baby and Family... perfect!
Here is a great video from Close To My Heart featuring the mini banner...Enjoy and check out my projects below.
Are you inspired yet?
I will start with the Baby Mini Banner...
Although the days of babies is over for me...until I have grandchildren or more friends and family have them... I love making items for babies because they are so pretty and you have so much room to interpret and embellish...(my favorite thing...lol!)
So here it goes...I used the Dotty For You paper so I will be adding this to my projects for the Heart 2 Heart Challenge ~ Polka Dots and Stripes...
I picked two patterns of chipboard pendents to use and kept the other 6 pieces for the other banner. I selected to use the polka dotted sides of the paper and opted to use the Lagoon and Pear sheets.
I started with cutting out the pendants (without the use of my cricut...how I never thought of that...lol!) and adhered it to the chipboard piece. I stamped the BABY using the {Token Alphabet} and added some cute little bugs from {A Little Buzz} I used my water color pencils and colored the dragonfly. I used Liquid Glass to add dimension and shine to the tail... and 3 Bitty Pearls to the B...
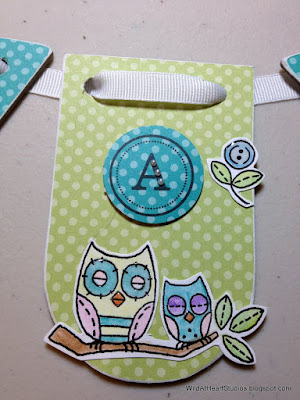
I cut out and adhered the pear dotty piece and stamped my A...added the Bitty Pearls. I colored the owls and button, added Liquid Glass to the Button and the owls' beaks and eyes...I love the dimension that Liquid Glass gives to a project and the shine is fabulous...
One this banner I added this super cute lady bug and now I thought about adding the Liquid Glass to the lady bug's dots but instead decided to add it to the shell omitting the dots to give her a beautiful shell that would make any lady bug out there jealous...
I fell in love with this cute little dotty butterfly... Completely colored and Liquid Glass added to the dots gives these wings some great texture and shine. I added a button again and Liquid Glass to it and you can see the great shine it gets...
Well now we have seen all the parts alone, now on to the complete project!
I strung it together using some White Daisy Grosgrain Ribbon and it is perfect for a door hanger or to decorate some nursery wall...
I had said that I wanted to make two and so here is the next one...
I used the Florentine paper and the remaining pendant pieces...
I decided to use the more muted sided of the Pemberley paper to give this banner a rustic feel. I used the {Posterboard Alphabet} for the title and used Brown Bag cardstock for the title. I stamped them out in Cocoa Ink and misted them with the Tsukineko Walnut Ink Antiquing sprays in Java and Eucalyptus. I used a sponge and gently rubbed the inks into the cardstock to create a beautiful deep and leather-like look to the letters...With a few Mocha Opaque Pearls to each letter and a added a beautiful resin flower from the Bouquet Assortment.
I distressed each of the pendants using my Close To My Heart Distressing Kit and gently sanded each of the edges. I think it just added a little more of a rustic feel and look to the project. Now you may have noticed that this banner comes with jump rings and I have not used any of them on either of these projects...let me explain why...
I find them to bend easily and slip open easily so I opt not to use them on many projects. This being my 4th time creating banners (I will post the other two in the future...) I have tried the jump rings and found that when transporting the banners and displaying them my banners would sometimes fall apart, so I have tried to find creative ways to form these banners...For this one I opted to use some brown satin ribbon I purchased from Michaels and ties some bows and this is the finished project...
Well I hope that you have enjoyed this blog post and that you will look at the other projects over at Heart 2 Heart Challenges...
Let's Live Inspired!


Your baby banner is super cute!
ReplyDeleteLovely, lovely, lovely! When you get a chance stop by my blog, I gave you an award!
ReplyDeleteCheers,
Candra
www.PaperDragonFleur.blogspot.com
Wonderful job on both banners! I really like the bows you tied between the pennants in the second one. Thanks for sharing with us at H2H!
ReplyDeleteWonderful banners! You've been such a busy girl. Thanks again for sharing your talent with us at H2H!
ReplyDeleteGreat banners..........I really need to break open my packages as well. Thanks for playing with us at H2H!
ReplyDeleteGreat FUNN banners to have made - they aren't too hard for the amount of cute you get!
ReplyDeleteThanks for playing H2H twice!